There are various essential knots for tying a tarp and their importance cannot be overemphasized. If your tarp isn’t secured properly, it can get damaged and even cause injury!
Notably, you’ll need to use a different type of knot depending on whether you want to anchor a tarp to the ground, hang it above your head, or relax in a hammock among the trees.
So, in this article, you’ll get a step-by-step guide to tying a tarp with different knots—including tips on how to tie it to a tree and to the ground. Let’s begin!
5 Essential Knots for Tying a Tarp
Knowing how to tie proper knots is a very useful skill for bushcrafting, camping, and other everyday or survival situations.
Tying a knot properly during camping, in particular, is essential. If you don’t tie your tarp properly, it might balloon out (the parachute effect) and get blown off in the wind—potentially leading to damage, loss of the tarp, and even injury.
Thus, you really need to know how to tie a tarp properly—and that’s what this section is about. You’ll learn 5 different ways to tie a tarp for different purposes.
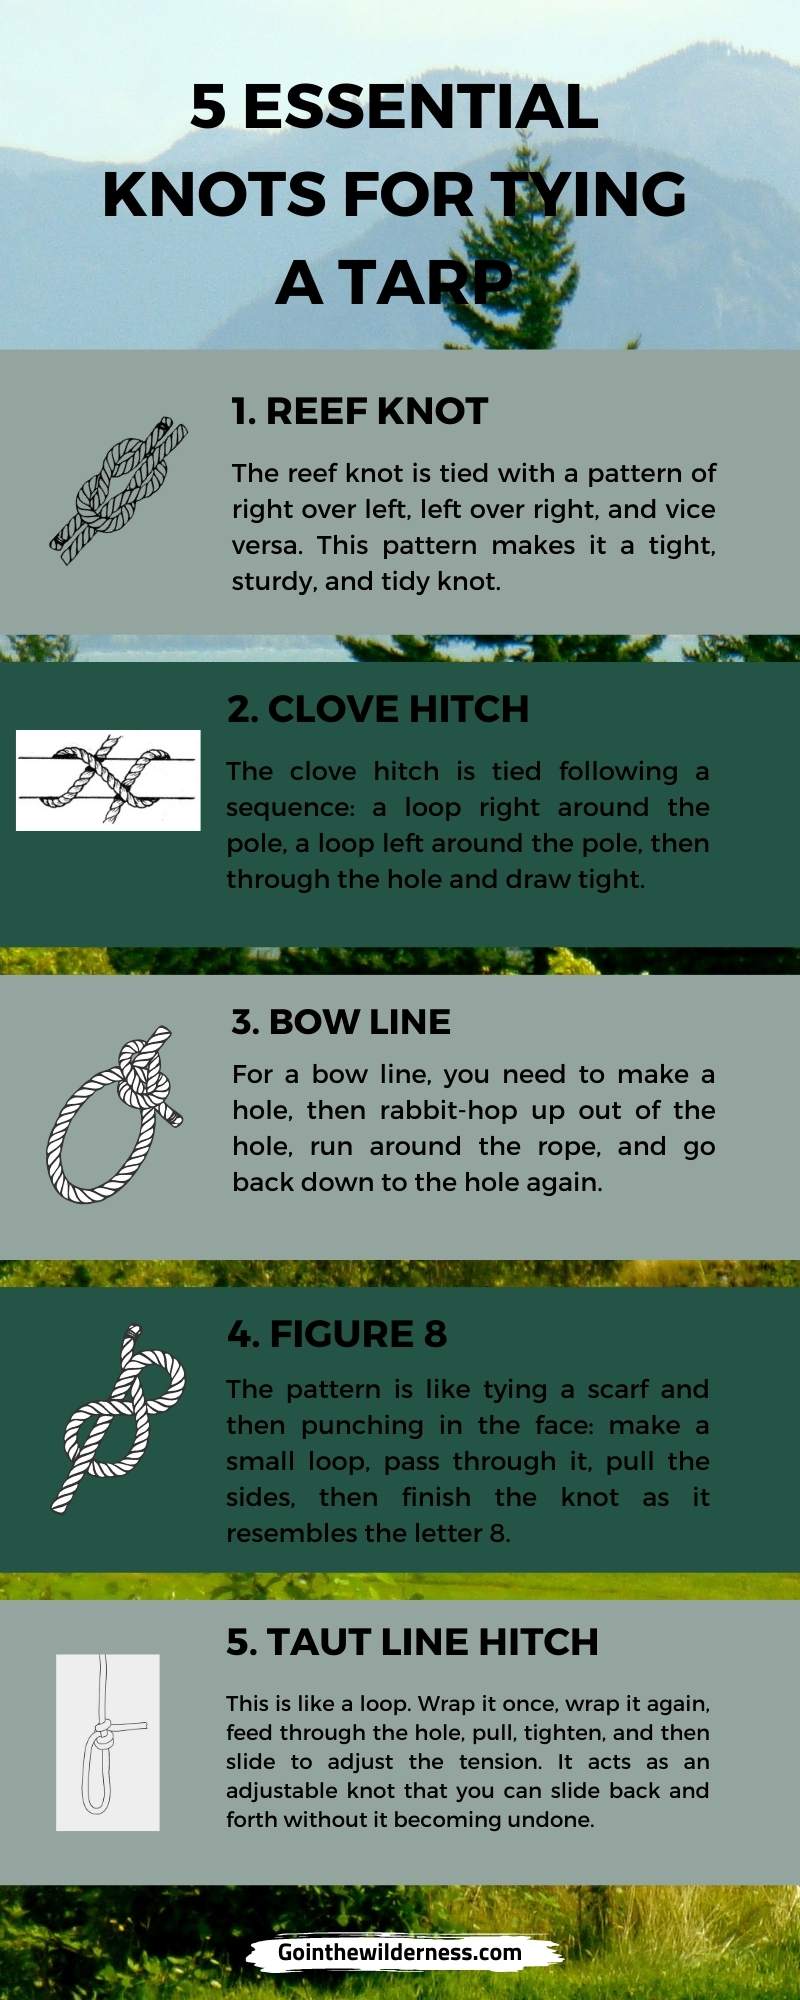
1. Reef Knot
The reef knot is the basic knot everyone needs to know. It is tied with a pattern of right over left, left over right, and vice versa. This pattern makes it a tight, sturdy, and tidy knot.
The reef knot is used to secure objects, especially things like packages, a bundle, or even first aid materials. When you cover something in a tarp and need to tie it with a rope, the reef keeps it in place and secure.
2. Clove Hitch
The clove hitch is tied following a sequence: a loop right around the pole, a loop left around the pole, then through the hole and draw tight.
This type of knot is useful for tying the end of a rope to a stationary object. It is best when you want to tie your tarp around poles, tie a hammock, or secure something onto roof racks.
3. Bow Line
For a bow line, you need to make a hole, then rabbit-hop up out of the hole, run around the rope, and go back down to the hole again.
This is the ultimate knot for making a loop. No matter the tension, the bow line loop keeps its shape and can still be untied even after a long period of stress.
Given the bow line’s strength, it can particularly come in handy during emergencies: if someone needs help, you can form a bow line loop and the person can grab onto it and be pulled out of danger.
4. Figure 8
This is typically like an 8. The pattern is like tying a scarf and then punching in the face: make a small loop, pass through it, pull the sides, then finish the knot as it resembles the letter 8.
This knot is mainly a stopper knot: it guides the end of a rope and prevents it from slipping off. This knot is essential to climbers and can also be used to finish off other types of knot to make the ends more secure.
5. Taut Line Hitch
This is like a loop. Wrap it once, wrap it again, feed through the hole, pull, tighten, and then slide to adjust the tension.
This knot is not as simple as some others, but once you learn it, you will use it often. It acts as an adjustable knot that you can slide back and forth without it becoming undone.
Example uses for the taut line hitch include adjusting the tension on ropes for a tarp and creating cushion effects.
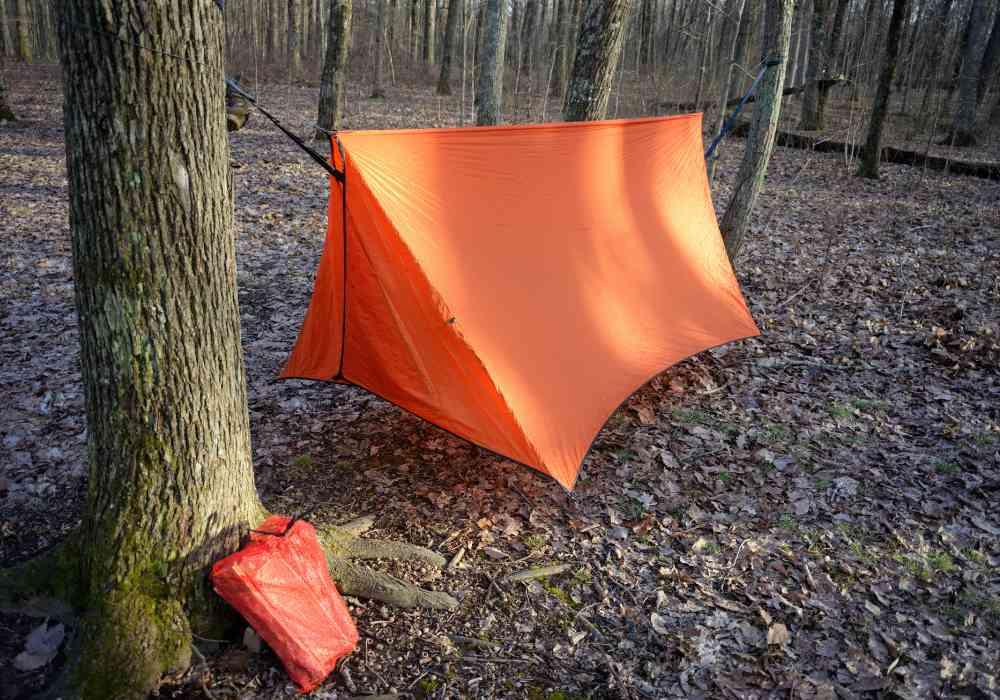
What Knot Do You Use to Tie a Tarp To a Tree?
To tie a tarp to a tree, you should use the bowline knot as it’s a great anchor knot. It will hold your tarp firmly to the tree, and no degree of tension will be able to push it off. Remember that you can also use a bowline knot to stake out tents or rescue someone in danger.
How Do You Tie Down a Tarp to the Ground?
To tie a tarp to the ground, you need rope, spring, and pegs (the ropes can be a paracord or other secured rope). Here are the steps you need to take.
First and foremost, make sure you feed the rope through every eyelet of your tarp. This may take a lot of time, but it is worth it because the eyelets distribute a load of wind across the tarp and help secure it more strongly.
Secondly, make sure the ropes span across the tarp when you feed them through. This can be done in a criss-cross fashion as you feed the rope from one eyelet to the opposite eyelet.
Thirdly, use springs to help manage tension. A spring will raise your hammock well even in the wind, preventing (or at least mitigating) the parachute effect.
Last but not least, use pegs or bolts to secure the tarp properly. If you are drilling or hammering your tarp into the ground, it is best to use a peg for each eyelet.
Following these steps carefully should ensure your tarp stays in place, no matter how strong the wind!
Summary
Securing a tarp properly is a key safety precaution during camping. In this article, you learned how to do it, using different types of knot for different purposes. You also learned how to tie a tarp to the tree and to the ground. Now it’s time to test your skills out in the wild!
I am Bruno. Navigating the urban rush by day, I find peace under the stars by night. Alongside my loyal companion and co-adventurer Lilith, we explore the balance between city life and nature’s embrace. Through writing and films, I delve into bushcraft and the wild’s allure.
GointheWilderness is my bridge between these two realms, guiding you to reconnect with your innate wilderness.
Eden is here and now; join us in rediscovering it.